Tools
The list of tools can be divided into two categories. Firstly, those used only in the construction, and secondly, those used in the ongoing maintenance afterwards (and in all likelihood, in the construction). For one off usage, you can save costs by just getting a basic tool, but if you intend to keep it for long term usage, then it is probably worth spending a bit more. Prices are again listed to give you an approx idea of costs, are relevant to 2022.
Ground Construction Tools
- Hire Eqpt (Plant hire)
- 3 ton Dumper – for transporting sand and dirt, that will in all likelihood have delivered to a point away from the diamond. Although we also found it useful for dragging the 1 tonne bags of dirt, from where they were delivered to the approrpriate place on the diamond, since they had handles, and save loading the dumper. But note that this only worked when they were less than half full….the handles were not strong enough for more! Note that you can get a dumper with a power swivel for rotating the container 90 degrees, for easier placement, but we managed ok, with regular one
- 1.5 ton Digger – vital for the following tasks:
- loading loose dirt into the dumper
- digging out the cut outs – although you do need to be very careful to get a level base, otherwise you will waste a lot of dirt filling it. We would receommend paying an experience operator somewhere in the region of £150 for a days work
- Turf Cutter – Don’t bother with one of these. For the areas you have to remove grass i.e. for the bases, the groud will either be too hard (in summer) and will just break up, so a Digger is better, or it will be too wet, and you will end up with very deep and heavy turfs. Just use the Digger and accept the removed turf will be waste.
- Compactor – Prefereably petrol unless you have a near electric source, and also probably worth hiring a couple of them, as they are not expensive. They will be used to compact the foundations or dirt mix when creating the cut outs. They do require the material to be a bit moist….we tried in the middle of a very hot summer, and there was no moisture to help with compaction
- Hose – depending on how far your diamond is from a water source, it will be vital to have water. We purchased 100m hose, along with spray nozzle and connectors, for approx £60, but then had to spend another £100 on a reel on which to store it and move it around, as they are much heavier than you realise!
- Landscaping rakes – will be needed to level any of the dirt you lay down. Although foundation material, can be levelled off with a tamper or the bucket of a differ
- Spades – Useful for getting neat edges to the cut outs, as the digger can only do so much. Can also be used for shovelling, although not as good as….
- Shovels – Which are not spades, as they are wider and have raised edges to help keep the material on them. Probably help manually move aggregates twice as quickly. Would recommend 3 or 4 of these.
- 10″ Tamper – a manual alternative to a compactor, although as these are much smaller you wouldn’t want to do a whole base area. But very useful for tamping down clay bricks in the moud/home plate and other areas which are harder to get into. Also useful for future maintenance
- Marker string and Pegs – PRobably 100m long, and worth getting 2 lines, as that will be helfpul when trying to get points equidistant from others, and also to ensure a square and symetrical diamond. Get good, solid metal pins, and probably a rubber mallet, as well, as if putting into hard ground, they can be difficult to go in, and/or bend
- Marker Paint – In addition to a line marker, which you will need to purchase at some point for line marking, it would be worth getting some cans of spray paint that can be used to mark out areas to be cut out, or when laying out the diamond. You would be surprised how club members can cut out the wrong area, if it is not specifically marked!
- Wheelbarrows – Even with the digger/dumper, there will be some need to manually move aggregates around, and have a couple of wheelbarrows will be useful. No need to get them too large, as they become much harder to move when fully loaded.
Ground Maintenance Tools
When you have completed the work, you will want to invest in some tools for keeping the diamond in good condition. Obviously items like the rakes, tampers and hose will also be useful for maintenance, there are a number of other tools you can purchase or make (as we did to save some costs), that will help. Of course with regards ground maintenance, there are a lot of online guides that cover both tools and techniques, so we will only outline those we used.
- Drag Mat. As it sounds a mat that can be dragged round the cut outs to smooth them over, once raked. Can be a rough mat or chain link fence type tool, with a rope handle. Not too hard to make yourself, and a lot cheaper than those that can be bought online
- Line Marker. We use Network Sports for purchasing our line marking kit, and went for this line marker from them. We found their marker paint to be a little weak, so actually buy ours online from Travis Perkins, although we switched from using exclusive line-marking paint to watering down standard white emulsion paint and that worked very well and was cheaper. Just ensure that you clean the machine regularly and don’t leave the paint to stick.
- Battery Strimmer. Although the school mows the grass, it can’t get right up against the fence, nor does it always do a good job around the cut outs, so a siple batter operated strimmer, is all you need to keep these areas under control
- Nail drag. (see photo) This was imperative to use both before and after games (and training).
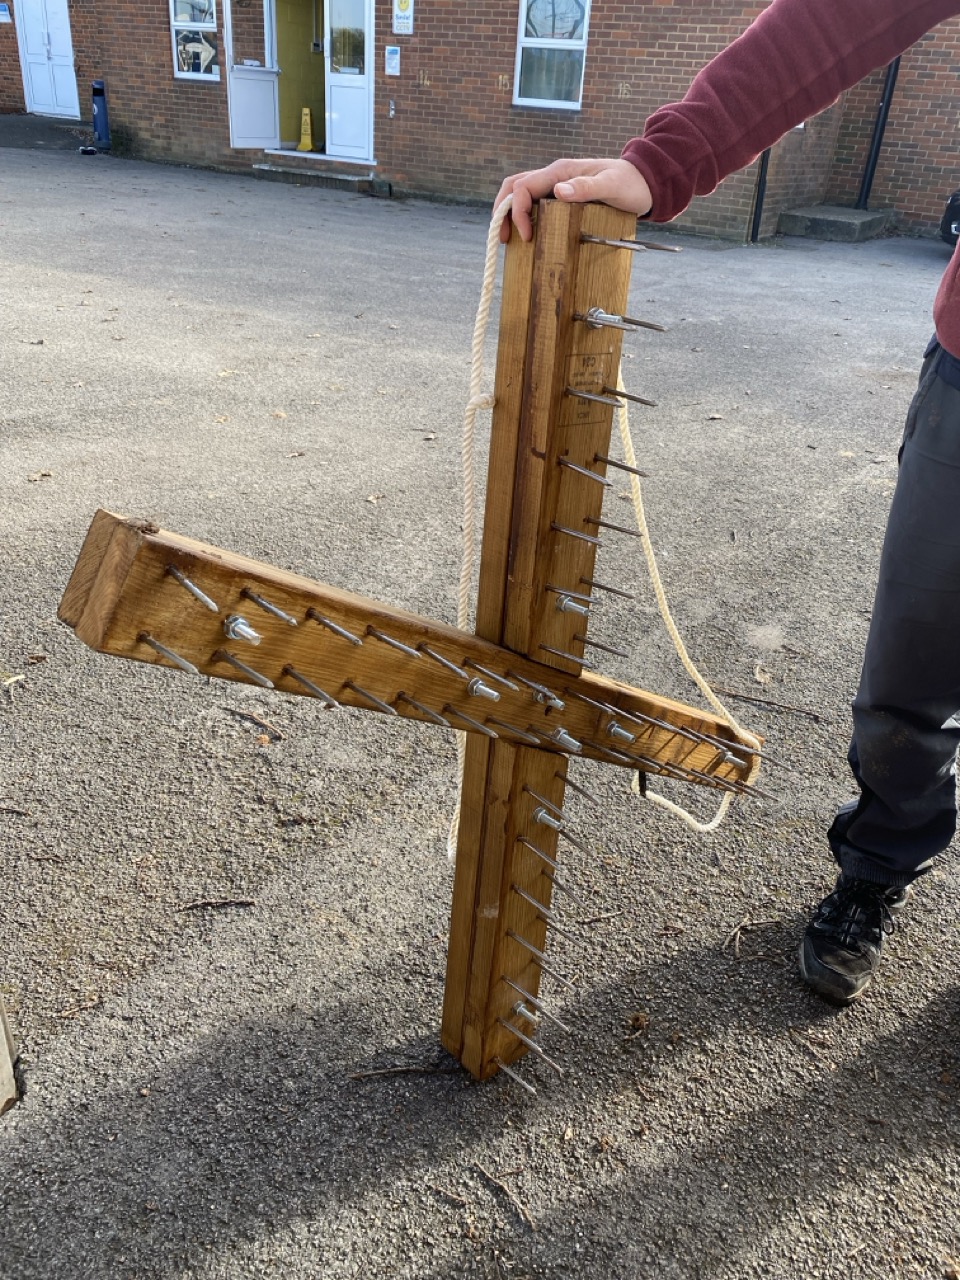 The aim is to loosen the top layer of the soil to avoid cleat marks. Using this also helps avoid sunken areas. Note that this is not for use on the mound as the mound requires a gentler approach. We made our own as we could not find a UK supplier for a hand-pulled drag.
 - Infield screening rake was used a lot. A very useful tool to move and smooth dirt quickly and easily. Good to use in-between double-header games too.
- Plastic garden rake was perfect to pull back dirt displaced into the grassed areas and also any grass from the dirt after tidying edges. Simple but effective.
- Dirt Repair Tools. Alongside the traditional spade and rakes, we used smaller tools such as trowels and a wide chisel for marking out and finessing when digging the areas identified for repair. A larger tool such as a tamp was needed to break up the clay bricks once they became hard and a bucket to transport required. See the section on how to repair dirt areas for the process.
- Finishing drag. We made this from a large doormat strengthened at the top with an aluminium strip and then tied a pulling rope to it. This was designed to smooth the dirt after the nail drag. In reality this was rarely used as the nail drag gave a good enough surface to play on. If we had the film cameras around then we would use it but it mainly stayed in the tools container.
- Batter’s box template. We made our own out of simple plumbers plastic pipe and the 90 and 180 degree elbow connections.
Sections
Costs (as of 2021/22)


